Converting a Chainlink Fence
If you're a homeowner looking to upgrade your yard without tearing everything down, converting a chain link fence to a wood fence may be the perfect DIY project. Not only does this transformation offer a major boost in curb appeal, but it also enhances privacy, making your outdoor space feel more secure and intentional.
For many homeowners balancing style, function, and budget is key. A chain link fence makeover provides an affordable way to modernize your property without the expense of a full fence replacement. And if you’re a dog owner, a wood fence can offer added protection by blocking visual distractions and preventing unwanted barking or fence aggression, helping to create a calmer environment for both you and your pet.
Whether you're preparing to sell your home or just want a more stylish, secure backyard, this guide will walk you through how to convert a chain link fence to wood, step by step. From tools and materials to expert tips and design ideas, you’ll find everything you need to complete the project confidently—and boost the value of your outdoor space.
Can You Reuse Chain Link Fence Posts for a Wood Fence? Absolutely—Here’s How
One of the easiest ways to save time and money on your fence makeover is by reusing the existing metal posts from your chain link fence. If the posts are still solid and properly anchored in concrete, you don’t have to remove them to build a new wood privacy fence—you can build right onto them. This approach is not only budget-friendly but also reduces labor and waste, making it a great solution for a fast yet beautiful fence conversion.
Why Reuse Chain Link Fence Posts?
- Cost savings: No need to dig new post holes or pour concrete
- Time-efficient: Skip the hardest part of fence installation
- Eco-conscious: Less demolition = less waste
- Perfect for homeowners with dogs: Keeps your yard secure during the project
Tools & Materials Needed
Before you start your fence makeover project, it’s essential to gather the right tools and materials. Having everything on hand will save time, reduce frustration, and help ensure your conversion from chain link to wood fence is smooth and successful. Whether you're going for a sleek horizontal design or a classic vertical picket look, these essentials will get the job done right.
Essential Tools for Fence Conversion
Cordless DrillFor installing brackets and screws quickly and securely

Tape measureAccurate measurements are critical for even spacing

Level Ensures your fence panels or pickets are installed straight
.png)
Socket wrench or adjustable wrench To remove the chain link fabric and tension wires and install new brackets
Safety gearGloves, safety glasses, and ear protection for working with power tools
Saw (circular or miter)For cutting wood rails or pickets
Materials You’ll Need

Wood fence panels or pickets: Choose between pre-assembled panels or individual pickets, depending on your design preference
Wood rails (2x4s)If building your own panel sections, these will serve as horizontal supports
Wood-to-metal brackets or fence post adaptersThese attach your wood rails or panels to the existing metal posts
Self-tapping screws or lag boltsUse exterior-grade, rust-resistant fasteners for long-lasting durability
Exterior wood stain or paint To protect your wood from moisture, UV rays, and wear
Best Wood Options for Fencing
Choose durable, weather-resistant wood types for your fence:
CedarNaturally resistant to rot and insects, with a warm, rich color
RedwoodHigh-end option with excellent durability and a bold appearance
Self-tapping screws or lag boltsUse exterior-grade, rust-resistant fasteners for long-lasting durability
Pressure-treated pine Budget-friendly and readily available, but requires sealing or staining
Before You Begin: Check Post Stability
Before committing to the conversion, inspect each metal post:
- Are they plumb (vertically level)? Use a level to check.
- Are they firmly set in the ground with no wobbling?
- Eco-conscious: Less demolition = less waste
- Are they spaced correctly? Standard wood fence panels are 6 or 8 feet wide—measure to ensure compatibility.
If the posts are solid, you’re ready to move on.
Step-by-Step Guide: How to Convert a Chain Link Fence to a Wood Fence
Now that you’ve gathered your materials and tools, it’s time to dive into the transformation process. This section breaks down how to convert a chain link fence to a wood fence—step by step—using your existing metal posts as the foundation. Whether you’re going for a rustic cedar look or a modern horizontal slat design, following these steps will help you build a sturdy, attractive, and dog-friendly wood privacy fence with confidence.
Step 1: Remove the Chain Link Fabric and Hardware
To prepare for your new fence:
- Remove the top rail by loosening the bolts , unwinding metal ties or cutting with a reciprocating saw.
- Detach the chain link fabric by undoing the tension bar and rolling the fabric away from the posts.
- Cut and remove any tension wires at the bottom of the fence.
- Take off all old brackets and hardware to create a clean surface on each post.
Step 2: Install Wood-to-Metal Fence Brackets
To attach your wood panels or rails to the metal posts, you’ll need wood-to-metal fence brackets or post adapters. These are designed to wrap around or bolt directly into the round metal posts.
- Start by measuring the diameter of each metal post—this is crucial. Posts can vary in size (typically 1 ⅝", 1 ¾", 2", or more), and in some cases, different post sizes are used along the same fence line. Selecting the correct bracket size will ensure a secure fit and prevent wobbling or misalignment.
- Mark where your horizontal wood rails will go—typically two or three rails per section (top, middle, and bottom).
- Many brackets come with bolts included, but be sure to have the correct drill bit or driver to fasten them properly into metal.
- When attaching brackets, don’t overtighten them at first. Leave a bit of wiggle room so you can make small adjustments to either side of your crossbeam or rail to ensure it's perfectly level before fully securing everything.
- Once aligned, finish tightening the brackets so your wood is locked in place.
For added durability, use rust-resistant, exterior-grade hardware, and consider brackets rated for high-wind or heavy-duty use—especially in variable climates.
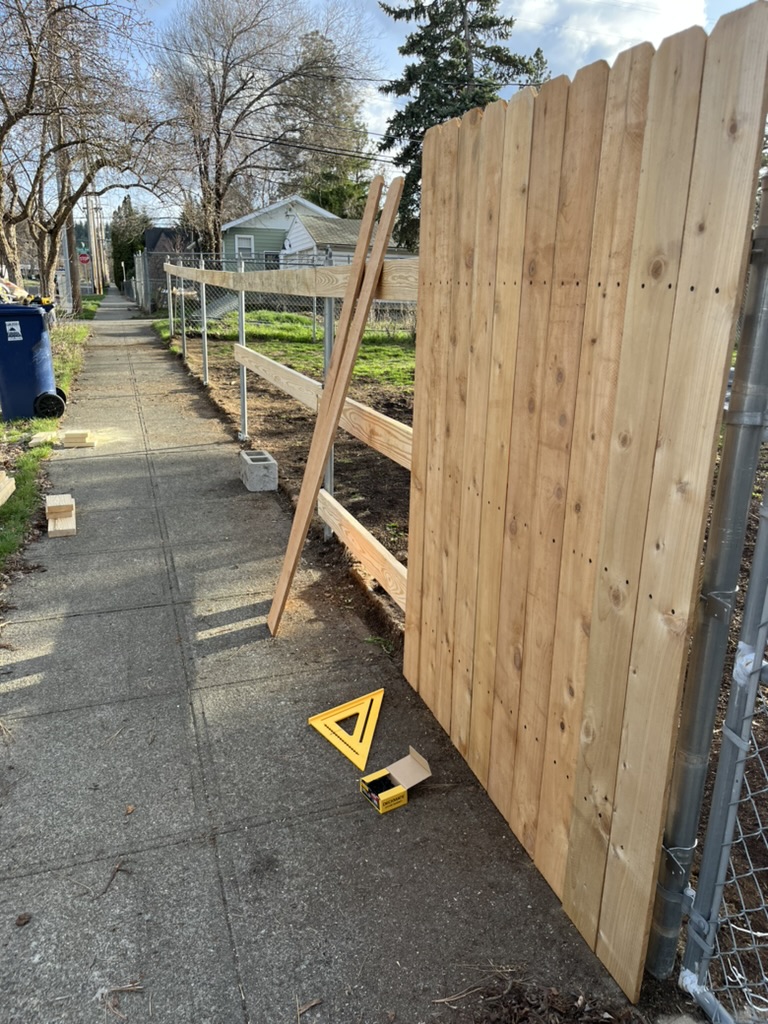
Step 3: Attach Crossbeams and Install Fence Panels or Pickets
With your brackets installed and aligned, it’s time to start building the wood frame of your new privacy fence. This step involves attaching horizontal wood rails (also called crossbeams) to the metal posts before adding your vertical panels or pickets. These rails provide the structural support your fence needs to stand strong for years.
Attach Crossbeams to Brackets
- Cut your 2x4 wood rails (crossbeams) to fit snugly between posts—standard spacing is 6 to 8 feet depending on your layout.
- Slide each crossbeam into the wood-to-metal brackets you installed in Step 3.
- Use a level to check that the beam is perfectly horizontal before tightening the bracket bolts completely.
- Attach all crossbeams: typically two rails for a 4–5 ft fence and three rails for 6 ft and taller for added strength and stability.
⚠️ Note: This part of the project is usually best done with two people. It can be very difficult to hold the crossbeam in place and accurately attach one side, then the other, without assistance. Trying to do it solo often results in screws going in at the wrong angle or misaligned brackets. Having a second person to hold and level the beam makes the job much faster and more precise.
Step 4: Attach Attach Rails or Panels
Install Pickets or Pre-Built Panels
- Start at one end and attach each picket vertically to the rails using exterior-grade screws or nails.
- Use a level or carpenter’s square to make sure your very first picket is perfectly straight—this is crucial.
- Use a spacer (like a wood shim, scrap piece of picket, or level) between each picket to maintain consistent gaps.
- Periodically step back to check alignment and make any needed adjustments as you go.
Why it matters: If the first picket is crooked, every picket that follows will also be off, resulting in a visibly uneven and unprofessional-looking fence. Taking a few extra minutes here saves time and frustration later.
Why use a spacer? Even spacing improves visual consistency and allows for airflow and expansion, reducing the risk of warping or moisture buildup over time.
Dog Owner Tip:If your dog is a jumper, digger, or escape artist, consider extending pickets slightly below ground level or installing a pressure-treated kickboard at the bottom for added security.
Step 5: Add Finishing Touches
Once your panels or pickets are secured:
- Seal or stain the wood to protect it from moisture, sun damage, and pests. This also gives your fence a polished, finished look.
- Cap the posts (optional) with decorative covers or treated wood blocks for a more professional aesthetic.
- Walk the perimeter to check for loose screws, uneven boards, or sharp edges—especially important if children or pets will be in the yard.
Step 6: Clean Up and Enjoy Your New Fence
Tidy up any debris, safely dispose of old materials, and take a moment to enjoy your upgraded outdoor space. Your DIY wood privacy fence is now complete—and it not only looks better, but it also functions better for your lifestyle.
Whether you’re creating a stylish backdrop for your backyard, increasing your home’s resale value, or giving your dog a calm, secure space to play, this conversion delivers real results.
Up Next:
Just Completed:
Check out our latest article where we share the complete process of creating a stunning herringbone patio! From selecting the right materials to laying the intricate pattern, we take you through every step with tips and tricks we learned along the way.
Herringbone PatioUp Next:
Now that the pattio is completed the next step is to add shade and a little bit of protection from the elements. We will be choosing either a pergola kit or building plans to enhance the patio buy adding a pergola surounding it.
Pergola Inspiration